Growing in containers saves space, but it's also a smart alternative if you are restricted by too much shade, poor soil, too little time, limited mobility or a difficult climate. Container gardens can be much more productive than a regular garden while allowing you to avoid most pest and disease problems. Best of all, it brings your garden right up close, creating a sense of intimacy that you don't get in an ordinary backyard garden.
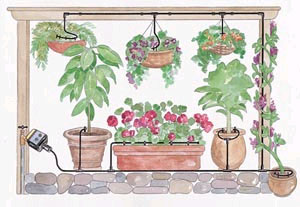 |
Watering can sometimes be a challenge for container gardeners. However, a drip-irrigation system makes things easier. makes things easier. |
Almost anything can serve as a container for growing plants. In addition to terra cotta, plastic or pressed fiber pots, you can use recycled whiskey barrels, 5-gallon food buckets, bushel baskets, plastic tubs, wooden planter boxes, even old tires! Self-watering planters , which have built-in water reservoirs, are great solutions.
The size of containers that you use should be determined by the plants you plan to grow. Radishes may get by in a 6-inch deep container, but don't try to grow a tomato plant in a container that holds less than 5 gallons of soil. The general rule is to use the largest container possible, because the more soil there is, the more root space there will be -- and the longer your plants can go between waterings.
Make sure the containers have drainage holes -- on the sides rather than the bottom if possible -- so excess water can drain and roots won't get waterlogged. For large pots with drainage holes on the bottom, elevate the pots on bricks or scraps of wood so that the water can escape.
In general, a 20-gallon pot should have four to six 3/4-inch holes; a 30-gallon pot should have at least eight 1-inch holes. You can put stones or bits of crockery in the bottom of the pot, but with a well-aerated soil mix, this is unnecessary and will only steal valuable root space.
Soil Mixes
Once you have chosen the right container, you are ready to pick a soil mix. Soil for container-grown plants should be light and friable, well drained and moisture-retentive. Garden soil is much too dense and can introduce disease and insect problems. Most container-grown plants are happiest in a soilless blend comprised of sphagnum moss, vermiculite or perlite, with the addition of finished compost.
It's easy to purchase a pre-mixed blend, such as Container Mix or Self-Watering Container Mix , which is especially formulated for planters that wick moisture from a built in reservoir. You can also create your own mixes, using the following recipes as a guide.
Organic Blend: 5 gallons finished compost, 1 gallon builder's sand, 1 gallon vermiculite or perlite, 1 cup granular-all purpose organic fertilizer.
Standard Blend (Cornell Mix): 1 bushel vermiculite, 1 bushel ground sphagnum moss, 8 tablespoons super phosphate, 8 tablespoons ground limestone, 2 cups bone meal.
Light Blend (for rooftops): 5 gallons ground sphagnum moss, 5 gallons vermiculite or perlite, 2 gallons compost, 1 cup granular all-purpose organic fertilizer.
Any soil mix will become compacted over time. If your containers seem water-logged and heavy, you may need to replace your soil mix at the start of a new growing season with a fresh mix. Or, you can replenish the soil with Container Booster Mix , which recharges depleted soil.
Caring for Your Plants
It's easy to grow plants in containers, but they do require attention at regular, frequent intervals.
Watering
If you go off to work in the morning without watering your windowboxes or patio containers, you are likely to come home to droopy, if not dead plants. When plants get too dry, their delicate feeder roots die and the plant must concentrate its energy on re-growing damaged roots rather than producing fruit or flowers.
That means unless you use self-watering planters or have a drip-irrigation system, you'll probably need to check on your plants daily, and maybe even twice a day if the weather is really hot. If you have more than a few planters, and especially if you travel, a drip-irrigation system
is ideal.
Three Watering Innovations for Containers
1. Water-holding crystals absorb and retain up to 200 times their weight in water. When blended into the soil, polymers can reduce your watering chores by 50 to 70 percent. Terra-Sorb
 is made of potassium-based polymers, so in time, it breaks down into fertilizer.
2. Self-watering containers
have an inner pot that holds the plant and soil, and an outer pot or bottom reservoir that holds extra water. A wick joins the two and pulls water up into the root ball as it's needed. Most reservoirs are large enough to supply water for several days or more depending on the weather. Liquid fertilizer can be added to the reservoir to ensure an adequate supply of nutrients. These containers can generally be used both indoors and out.
3. Drip-irrigation systems
are simple, easy to install and take the work and worry out of watering. Add a timer and your plants will be content even if you can't be there to give them daily attention.
Watering Tips
- Start with a moisture-retentive soil mix.
- Water until all the soil in the container is moist and water runs out the drainage holes.
- For large containers, reduce evaporation by covering the soil surface with a thin layer of mulch (shredded bark, leaf mold, dry grass clippings or straw.)
- Reduce moisture loss from leaf surfaces by using a lattice, trellis, awning or umbrella to shield plants from midday heat.
- Never water your plants with softened water. It contains dissolved salts that are toxic to plants. Rainwater (collect it in a barrel from your roof) is best.
- Cluster your potted plants to create a little microclimate that will minimize moisture loss and increase humidity.
Fertilizing
Because most potting mixes provide few nutrients, your plants will be totally dependent on you for their food. Add granular organic fertilizer
 at planting time, then water weekly with half-strength, water-soluble fertilizer
 . Foliar feed with seaweed or fish emulsion for a quick pick-me-up if your plants look stressed or have been cut back.
Maintenance
Each week during the growing season, remove spent flowers and pinch back leggy stems. When necessary, replace tired plants with some fresh annuals, especially late-season favorites, such as ornamental kale and mums.
If you plan to overwinter some of your potted plants, they should be cut back and put in a cool location. Water sparingly and do not fertilize until spring. Once warm weather arrives, remove plants from their containers, tease away old soil, and repot the plants in a fresh soil blend.
Trellises and Supports
Some sort of vertical support is a necessity for container-grown tomatoes, cucumbers, and flowering vines. Trellises can also add a beautiful vertical accent when covered with morning glories or sweet peas. Keep the scale of the trellis in proportion to the pot, and be sure to attach it securely using brackets or wires. Losing a mature tomato plant or flower-covered trellis to an August thunderstorm can be heartbreaking.

